Saturday, August 6, 2022

Complete POS Management and Inventory System with Barcode in PHP MySQL [UPDATED]

Project: POS Management and Inventory System Project in PHP and MySQL with Source Code

About POS Management and Inventory System in PHP MySQL Project Free Download

POS Management and Inventory System Project in PHP MySQL Free Download enables you to manage inventory, sales, purchases, customers, invoices, receiving payments, and more. It will also allow you to make purchases and sales from anywhere, anytime. Whether you run a small business or a large company It's the solution you need to manage inventory, purchases and sales - all in one app.

Online POS Management and Inventory System Features

These are the following features of Online POS Management and Inventory System in PHP MySQL:
  • Easy POS and Dynamic dashboard
  • Items , Adjustment , Transfer
  • Quotations , Sales , Purchases
  • Returns Customer & Supplier
  • Users ,Customers, Supppliers
  • Currency , Units , Category , Backup
  • Payment Sales , Purchases
  • Payments Report
  • Overview & warehouse stock charts
  • Purchases & Sales report
  • Customers & suppliers reports
  • Product quantity alerts
  • Mail notification system addedd
  • Uses Structured And Customizable Sass Code
  • Integrated With Vuex,Vue Router
  • Dark Version Included
  • Multilingual 14 languages and More Will be added soon
  • RTL Support Adeed
  • Pure Vue Js ,No JQuery
  • Clean And Organized Code
  • Well Documented Code
  • Standard Folder Stucture
  • Easy POS and Dynamic dashboard
  • and Many More..

Script Comes With

  • Excellent support with a fast response rate.
  • Fix any bugs or broken content.
  • Help get you setup and installed!
  • Secure Database that uses prepared statements so no SQL Injection!
  • Protects against CSRF attacks!
  • HTML Filter to protect against XSS attacks!
  • Built using the latest Strong LARAVEL Framework.

Server Requirements

These are the following server requirements of Online POS Management and Inventory System:
  • PHP >= 7.3.0
  • Mysql 5.x or higher
  • BCMath PHP Extension
  • Ctype PHP Extension
  • Fileinfo PHP Extension
  • GD2 PHP Extension
  • JSON PHP Extension
  • Mbstring PHP Extension
  • OpenSSL PHP Extension
  • PDO PHP Extension
  • Tokenizer PHP Extension
  • XML PHP Extension

POS Management and Inventory System Installation

Installation in Server

These are the steps on how to install POS Management and Inventory System in Server: Step 1 : Login to cPanel and navigate to File Manager Step 2 : Not develop to work in sub folder. create a subdomain or use it in main domain., then click "Upload" Step 3 : Select your zip file and wait for upload to complete Step 4 : Unzip the uploaded file Step 6 : Go back to Cpanel and navigate to Databases

Creating a new database

Before installing, you will need to create a new database. If you already know how to do this or have already created one, skip to the next step.Please use empty database. In most cases you should be able to create a database from your cpanel. Useful resources cPanel - MySQL Database Wizard Plesk - Website databases db1 db2 Now you need to create a new user. On the same page go to create a new database user db3 Now add the user to the database. db4 And select full permissions on the database to that user db5 Setup Installation : Access the url yourdomain.com/setup and complete the installation Setup Wizard Step One: Name your application Select Environnement : Local in localhost and production in Server App Debug : it's better to choose false In server [caption id="attachment_11499" align="alignnone" width="1366"]pos management with inventory system installation pos management with inventory system installation[/caption] Step two:
  • DB HOST
  • DB PORT
  • DB DATABASE
  • DB USERNAME
  • DB PASSWORD
  • You can test connection with database
[caption id="attachment_11500" align="alignnone" width="1366"]pos management with inventory system installation 2 pos management with inventory system installation 2[/caption] Last Step: Click in Confirmed and waiting for generate database Notes : It is not recommended to close the browser or stop a process Installation last_step Once the installation has ran the empty file installed will be placed into the /storage directory. If this file is present the route /install will abort to the 404 page.

Installation in Localhost

You need to download XAMPP or LAMPP Server Step 1 : Go to C:\Windows\system32\drivers\etc\ open the "hosts" file in Administrator mode. Step 2 : Add the following code to it. Here 127.0.0.1 stocky.local Step 3 : Now go to, C:\xampp\apache\conf\extra for xampp users and for the wamp user "C:\wamp\bin\apache\Apache2.4.4\conf\extra" and open "httpd-vhosts.conf" file. Now add the following code into it. Notes :Change the Document root as per your project also add domain name as you define into the "hosts" file.
 
    ServerAdmin webmaster@stocky.local
    DocumentRoot "C:/xampp/htdocs/stocky"
    ServerName www.stocky.local
    ServerAlias stocky.local

     
            Options Indexes FollowSymLinks Includes ExecCGI
            AllowOverride All
            Require all granted
        

    ErrorLog "logs/stocky.local-error.log"
    CustomLog "logs/stocky.local-access.log" common

Step 4 : Last but the important step is to restart your Xampp or Wamp Setup Installation : Access the url http://stocky.local/setup

Nginx

If you are deploying your application to a server that is running Nginx, you may use the following configuration file as a starting point for configuring your web server. Please ensure, like the configuration below, your web server directs all requests to your application's public/index.php file. You should never attempt to move the index.php file to your project's root, as serving the application from the project root will expose many sensitive configuration files to the public Internet:
 server 
    listen 80;
    server_name example.com;
    root /srv/example.com/public;

    add_header X-Frame-Options "SAMEORIGIN";
    add_header X-Content-Type-Options "nosniff";

    index index.php;

    charset utf-8;

    location / 
        try_files $uri $uri/ /index.php?$query_string;
    

    location = /favicon.ico  access_log off; log_not_found off; 
    location = /robots.txt   access_log off; log_not_found off; 

    error_page 404 /index.php;

    location ~ \.php$ 
        fastcgi_pass unix:/var/run/php/php7.4-fpm.sock;
        fastcgi_param SCRIPT_FILENAME $realpath_root$fastcgi_script_name;
        include fastcgi_params;
    

    location ~ /\.(?!well-known).* 
        deny all;
    

read more : https://laravel.com/docs/8.x/deployment#nginx Related Questions for Installation Question 1: Do i need VPS OR Dedicated Server? ANS: No you can run our product with shared server too. Question 2: Which Hosting Provider will be best you think? ANS: Any hosting provider who provide Cpanel Based Hosting. Question 3: What is Cpanel? ANS: Cpanel is a Control panel for server. You can Check More Here Question 4: Don’t have Cpanel? ANS: No worry, its working with any control panel but Cpanel is too easy to manage, for that we recommend Cpanel based hosting.

How To Edit Code?

Once You Install The Product on Your Server, You Will have Two Folder and Few Files. On Folder “assets”, We keep all kind of asset like CSS, JS, Images. So if You Want To Edit Or Change Any Asset, Have a Look on This Folder. On Folder “core”, We keep The Core of Laravel. We Maintain Laravel Structure(MVC) on This Project. “core/routes/web.php” All Routes (URL) in This Folder. You can find the ControllerName@FunctionName Here. “core/app” All Models are in This Folder. “core/app/Http” All Controller are in This Folder. You can Change anything you want if you need to change any functionality. “core/resources/views” You Have All HTML Structure Here. You can Change anything you want if you need to change anything on HTML.

Template HTML Structure

The HTML template uses Latest Bootstrap v4 with valid HTML5 tags. This theme is a responsive layout with 12 column Support column. All of the information in content area is nested within a class and comes with predefined classes.

CSS Files and Structure

Mainly three main CSS files are used in this theme. The first one bootstrap.css, second one is style.css which for this template and third one is responsive.css to control responsive layouts. Used Css File For Various Purpose : bootstrap.min.css (in css Folder) font-awesome.min.css (in css Folder) jquery.circliful.css (in sass Folder) font-awesome.min.css (in css Folder)slick.css (in css Folder) swiper.min.css (in css Folder) style.css (in css Folder) Responsive.css (in css Folder) If you would like to edit a specific section of the site, simply find the appropriate label in the CSS file, and then scroll down until you find the appropriate style that needs to be edited.

jQuery and JavaScript

    • jQuery
    • Bootstrap (bootstrap.min.js)
    • gmap (gmaps.js)
    • Highlight (highlight.min.js)
    • Isotope(Isotope.pkgd.min.js)
    • Jquery UI(jquery-ui-slider.min.js)
    • Circliful(jquery.circliful.js)
    • Counterup (jquery.counterup.min.js)
    • Ripple (jquery.ripples-min.js)
    • Slicknav(jquery.slicknav.min.js)
    • Tubular(jquery.tubular.1.0.js)
    • Lightcase (lightcase.js)
    • Map Script (map-script.js)
    • Particles (particles.min.js)
    • Raindrops (Raindrops.js)
    • Slick (slick.min.js)
    • Swiper (swiper.min.js)
    • All Plugin Activation File (main.js)
  • jQuery is a Javascript library that greatly reduces the amount of code that you must write.
  • Most of the animation in this site is carried out from the customs scripts. There are a few functions worth looking over.
In addition to the custom scripts, I have implemented few “tried and true” plugins to create the effects. This plugin is packed, so you won’t need to manually edit anything in the file. The only necessary thing to know is how to call the method.

POS Management and Inventory System Modules

These are the modules of POS Management and Inventory System:

POS Printer Settings

Guide to Setting Up Receipt Printer to work with POS Small Receipts To set up receipt printer do the following: 1) If printer is not already installed, follow manufacturer instructions to set up the printer and install the software. 2) Go to settings for your printer in your operating system. Note: The next instructions are for Windows 10 printer settings.
  • Go to your Start Menu and click the Settings icon.
  • Go to Devices, then Printers and Scanners. This is your printer settings.
  • Once in your printer settings, find the receipt printer. Click the printer icon.
  • Next click Manage, then click Printer Properties.
  • Click the Advanced Tab.
printer1
  • Click Printing Defaults.
  • In the lower right corner of the Printing Defaults screen, click Advanced
printer2 printer3 
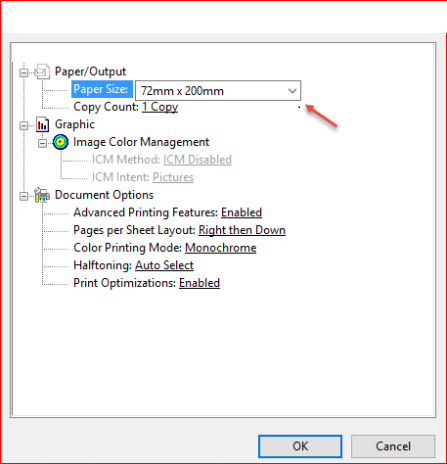
The setup of the receipt printer is complete. It should properly print small receipts. Note: These instructions are for Windows 10. If you are using an earlier version of Windows the settings should be similar. If you are using another operating system, find your printer size, find where to set the paper size and set it to 72mm x 200mm.

Print barcode/labels

Go to /app/products/barcode print_barcode 1) select warehouse 2) select Product 3) Set quantity 4) choose Paper size 5) click on Update 5) click on Print barcode_page

Login

login by default Email : admin@example.com Password : 123456 you can change password for security purpose

Dashboard

Dynamic dashboard
  • Today Sales
  • Today Income
  • Today Expenses
  • Today Profit
  • This Week Sales & Purchases
  • Top Selling Products This Month
  • Payment Sent & Received This Week
  • Top 5 Customers This Month
  • Recent Sales
[caption id="attachment_11507" align="alignnone" width="794"]pos management with inventory system pos management with inventory system[/caption]

Products

to create a new product it's very easy
  • Product Name (required)
  • Product Code (required)
  • Category (required)
  • Brand (optional)
  • Barcode Symbology (required)
  • Product Cost (required)
  • Product Price (required)
  • Product Unit (required)
  • Sale Unit (required)
  • Purchase Unit (required)
  • Stock Alert (optional)
  • Order Tax (optional)
  • Tax Method (optional)
  • Note (optional)
  • you can add multiple product image
  • you can add multiple variant of product
pos management with inventory system create product 
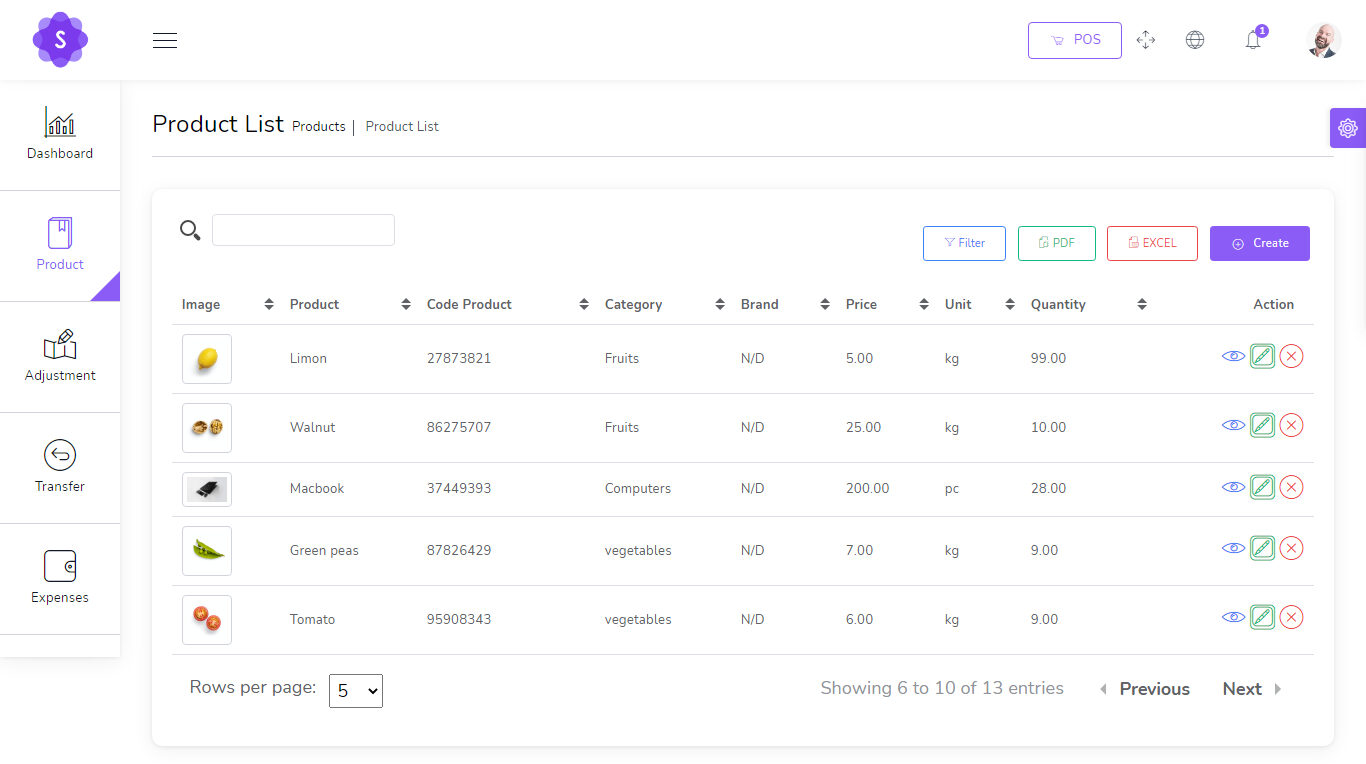
you can manage product list
  • Edit Product
  • View Details Product
  • Delete Product
  • Generate Product list in PDF
  • Generate Product list in Excel
  • Filter product by code , name , category , name
produc_list

Transfers

to create a new Transfer it's very easy
  • From Warehouse (required)
  • To Warehouse (required)
  • You can manage Transfer list
    • Edit Transfer
    • View Details Transfer
    • Delete Transfer
    • Generate Transfer list in PDF
    • Generate Transfer list in Excel
    • Filter Transfer by Reference , To warehouse , From Warehouse , Status
    • Status (required)

Adjustments

to create a new Adjustment it's very easy
  • Warehouse (required)
  • Select Product (required)
create_adjustment

Expenses

to create a new Expense it's very easy
  • Date (required)
  • Warehouse (required)
  • Expense category (required)
  • Amount (required)
  • Details (optional)
create_expense You can manage Expense list
  • Edit Expense
  • Delete Expense
  • Generate Expense list in PDF
  • Generate Expense list in Excel
  • Filter Expense by Date , Reference , warehouse , Expense category

Quotations

to create a new quotation it's very easy
  • Customer (required)
  • Warehouse (required)
  • Status (required)
create_quotation You can manage quotation list
  • Edit quotation
  • View Details quotation
  • Delete quotation
  • Change to Sale
  • Send quotation on email
  • Generate quotation list in PDF
  • Generate quotation list in Excel
  • Filter quotation by Date, Reference , Customer , Warehouse , Status

Sales

to create a new sale it's very easy
  • Customer (required)
  • Warehouse (required)
  • Status (required)
create_sale You can manage sale list
  • Edit sale
  • View Details sale
  • Delete sale
  • Change to Sale
  • Send sale on email
  • Generate sale list in PDF
  • Generate sale list in Excel
  • Filter sale by Date, Reference , Customer , Warehouse , Status , Payment status
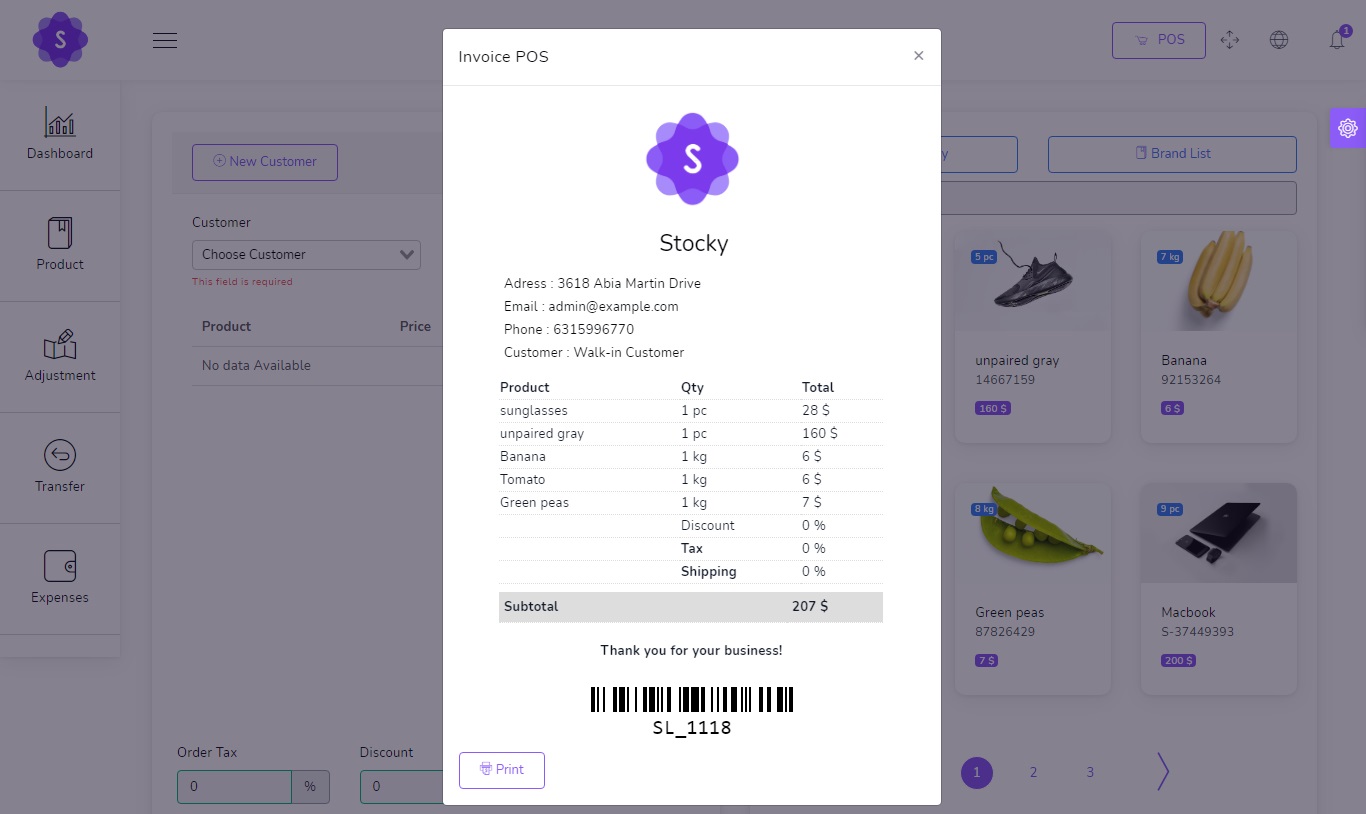
Sales POS

Easy POS
  • Barcode Scanner
  • you can search for product by name or code
  • Filter Product by Brand , Category
[caption id="attachment_11519" align="alignnone" width="1352"]pos management with inventory system free download pos management with inventory system free download[/caption]

POS Invoice

pos_invoice

Purchases

to create a new purchase it's very easy
  • Supplier (required)
  • Warehouse (required)
  • Status (required)
You can manage purchase list
  • Edit purchase
  • View Details purchase
  • Delete purchaseSend purchase on email
  • Generate purchase list in PDF
  • Generate purchase list in Excel
  • Filter purchase by Date, Reference , Supplier , Warehouse , Status , Payment status

Sale Returns

to create a new Sale Return it's very easy
  • Customer (required)
  • Warehouse (required)
  • Status (required)
You can manage Sale Return list
  • Edit Sale Return
  • View Details Sale Return
  • Delete Sale Return
  • Send Sale Return on email
  • Generate Sale Return list in PDF
  • Generate Sale Return list in Excel
  • Filter Sale Return by Date, Reference , Customer , Warehouse , Status , Payment status

Purchase Returns

to create a new Purchase Return it's very easy
  • Supplier (required)
  • Warehouse (required)
  • Status (required)
You can manage Purchase Return list
  • Edit Purchase Return
  • View Details Purchase Return
  • Delete Purchase Return
  • Send Purchase Return on email
  • Generate Purchase Return list in PDF
  • Generate Purchase Return list in Excel
  • Filter Purchase Return by Date, Reference , Supplier , Warehouse , Status , Payment status

Settings

System Setting
  • Edit Currency
  • Edit Logo
  • Edit Name Company
  • Edit Server SMTP

Config SMTP

smtp Go to /app/settings/System_settings and put your config smtp Host : Host smtp mail server Port : 25 or 587 or 465 or 2525) username : your username smtp mail server password : your password smtp mail server Encryption : tls or ssl

Complete Online POS Management and Inventory System Project

  • Name of Project: Online POS Management and Inventory System Project
  • Language:                  PHP
  • Databases used:      MySQL
  • Design used:            HTML JavaScript, Ajax, JQuery, Bootstrap
  • Browser used:          IE8, Google Chrome, Opera Mozilla
  • Software used:         WAMP/ XAMPP/ LAMP/MAMP

Demonstration

Login Details as below : Email : admin@example.com Password : 123456 I hope this Online POS Management and Inventory System Project in PHP MySQL with Source Code will help you with what you are looking for and hope that you will learn something with this project that is useful for your future projects.
Related Projects: Complete Ultimate POS with Inventory Software Free Download, Complete Inventory and Sales Management System using PHP MySQL, DepEd Equipment Inventory System using PHP/MySQLi, Simple POS and Inventory Management System in PHP/MySQL, Simple Product Inventory System using JavaScript, Sales and Inventory Management System using PHP CodeIgniter and MySQL, Pharmacy Inventory Management System in PHP MySQL, Computer Sales and Inventory System in PHP MySQL, Online Inventory Management System in PHP MySQL, Advanced Inventory Management System in PHP MySQL, Grocery Sales and Inventory System in PHP MySQL, Complete Multi Store Inventory Management System in PHP MySQL

Free Download Online POS Management and Inventory System Project in PHP MySQL with Source Code

[symple_button url="https://www.campcodes.com/downloads/complete-pos-management-and-inventory-system-free-download/" color="blue" button_target="_blank" btnrel="nofollow"]Download Here[/symple_button]
https://www.campcodes.com/projects/php/complete-pos-management-and-inventory-system-in-php-mysql/?feed_id=3420&_unique_id=62ee83cfe7527

Online Survey System in PHP MySQL Free Download Source Code

Project: Online Survey System in PHP MySQL with Source Code Free Download

About Online Survey System in PHP MySQL Free Download

This Online Survey System in PHP MySQL Free Download Source Code is a straightforward project that might be of assistance to a certain school, corporation, or other institution that is conducting polls or surveys among its constituents. The system allows for two different kinds of users: admins and subscribers or regular users. The administrator is the only user position that may create new users and is responsible for managing all of the information included inside this system. The subscribers and users are the people who utilize the system and respond to the survey. A user may easily develop a survey questionnaire using the system's intuitive form builder tool. There are just three different types of inputs that may be chosen from when using the survey form builder to choose how users or subscribers should respond to the questions. The radio buttons, the checkbox, and the text field make up the three choices. If the survey question requires only (1) one answer, then the radio button will be used. On the other hand, the checkbox will be used for survey questions that enable numerous answers from which the user or subscriber can pick. The textarea is going to be used for the dynamic survey question like the remark. A report that may be printed out is produced by the system for the outcome of each survey set.

Server Requirements

These are the following server requirements of Online Survey System in PHP MySQL:
  • XAMPP v3.3.0
  • PHP Version 7
  • PHP Language
  • MySQL Database
  • HTML
  • CSS
  • JavaScript
  • jQuery
  • Ajax
  • Bootstrap
  • AdminLTE Template
  • and some other libraries/plugins

Features of Online Survey System in PHP MySQL Free Download

All Users

  • Login Page
    • Users of the system will be directed to this page to provide their credentials before being granted access to the system's data and functionality.
  • Dashboard Page
    • After successfully checking in to the Online Survey System, users will automatically be led to this page after being brought there by the system.
  • Manage Account Modal
    • The popup window that allows users of the system to make changes to their system credentials, such as their password and email address.

Admin Side

  • New User Page
    • This is the page where system administrators may create new users.
  • Manage Users
    • View, edit, and delete functionality for the user list is included in this feature.
  • New Survey Page
    • This is the page where system administrators may build survey sets.
  • Manage Survey
    • This feature includes View, Edit, and Delete for the survey list.
  • View Survey Page
    • The page on which an administrator may manage the questionnaire for a particular survey collection.
  • Survey Report
    • The page that displays and allows the administrator to print the results of the survey.

Users Side

  • Survey List
    • The page that has a listing of all of the ongoing survey sets.
  • Answer Sheet Page
    • The page that displays the question for the particular survey set that was chosen. This is where the user will respond to the survey or take it.

Online Survey System Project

  • Name of Project: Online Survey System Project
  • Language:                  PHP
  • Databases used:      MySQL
  • Design used:            HTML JavaScript, Ajax, JQuery, Bootstrap
  • Browser used:          IE8, Google Chrome, Opera Mozilla
  • Software used:         WAMP/ XAMPP/ LAMP/MAMP
HTML, PHP/MySQLi, CSS, JavaScript (jQuery/Ajax), and Bootstrap were utilized throughout the development process in order to create the Online Survey System. The underlying code can perform all of its intended functions and is straightforward to alter or improve. To gain first-hand experience with this straightforward undertaking, simply follow the instructions that are provided below.

Screenshots

[caption id="attachment_13505" align="alignnone" width="830"]Online Survey System in PHP MySQL - Add Survey Online Survey System in PHP MySQL - Add Survey[/caption] [caption id="attachment_13506" align="alignnone" width="830"]Online Survey System in PHP MySQL - Survey List Online Survey System in PHP MySQL - Survey List[/caption] [caption id="attachment_13507" align="alignnone" width="830"]Online Survey System in PHP MySQL - Survey Report Online Survey System in PHP MySQL - Survey Report[/caption] [caption id="attachment_13508" align="alignnone" width="830"]Online Survey System in PHP MySQL - Users Online Survey System in PHP MySQL - Users[/caption] [caption id="attachment_13509" align="alignnone" width="830"]Online Survey System in PHP MySQL Free Download Online Survey System in PHP MySQL Free Download[/caption] [caption id="attachment_13510" align="alignnone" width="830"]Online Survey System in PHP MySQL Online Survey System in PHP MySQL[/caption] On this site, you can get the source code for free. Feel free to download the source code and change it in any way you want to meet your needs. Follow the steps below to get the project up and running.

How To Run??

Above all, to run this project you must have installed a virtual server i.e XAMPP on your PC. Online Survey System in PHP and MySQL with source code is free to download, Use for educational purposes only! Follow the following steps after Starting Apache and MySQL in XAMPP: 1st Step: Firstly, Extract the file 2nd Step: After that, Copy the main project folder 3rd Step: So, you need to Paste in xampp/htdocs/ Further, Now Connecting Database 4th Step: So, for now, Open a browser and go to URL “http://localhost/phpmyadmin/” 5th Step: After that, Click on the databases tab 6th Step: So, Create a database naming “survey_db” and then click on the import tab 7th Step: Certainly, Click on browse file and select “survey_db.sql” file which is inside the “db” folder 8th Step: Meanwhile, click on Go button. After Creating Database, 9th Step: Moreover, Open a browser and go to URL “http://localhost/survey

Login Access Information

Username: admin@admin.com Password: admin123 I hope this Online Survey System in PHP MySQL will help you with what you are looking for and hope that you will learn something with this project that is useful for your future projects.
Related Projects: School File Management System using PHP/MySQLi, Budget Management System using PHP/MySQL, Barcode Based School Event Attendance Monitoring System using PHP/MySQL, Online School Attendance Management System in PHP MySQL, School Fees Payment Management System in PHP MySQL, School Log Management System in PHP MySQL, Preschool Management System using PHP/MySQLi, Advanced School Management System with Complete Features, Complete File Management System using PHP MySQL, Task Management System Using PHP MySQL, Purchase Order Management System in PHP MySQL,Online ID Generator System  in PHP MySQL [symple_button url="https://www.campcodes.com/downloads/online-survey-system-in-php-mysql-source-code/" color="blue" button_target="_blank" btnrel="nofollow"]Download Here[/symple_button] https://www.campcodes.com/projects/php/online-survey-system-in-php-mysql-free-download-source-code/?feed_id=3414&_unique_id=62ee81a2dd2d3

Thursday, August 4, 2022

Purchase Order Management System in PHP MySQL Free Download Source Code

Project: Purchase Order Management System in PHP MySQL with Source Code Free Download

About Purchase Order Management System in PHP MySQL Free Download

This is a Purchase Order Management System in PHP MySQL. This is a straightforward online application that is used to handle the Purchase Order Records for a certain organization. This project has the potential to assist the organization in storing and retrieving the Purchase Order records in an easier manner. This mini-project has the potential to also be utilized in the development of an inventory management system. It has a lovely user interface in addition to having functions that are simple to use. This Purchase Order Management System has the capability to retain a list of all of the company's suppliers, making it simple to get the suppliers' information whenever a purchase order is generated. In addition to this, it keeps a list of items that the corporation could have bought from their vendors in the past. Create, read, update, and delete are the four operations that are included in both of the features that have been stated. In reference to the process of generating the Purchase Order, the system is capable of producing a printable Purchase Order Slip/Request.

Server Requirements

These are the following server requirements of Purchase Order Management System in PHP MySQL:
  • XAMPP v3.3.0
  • PHP Version 8.0.7
  • PHP Language
  • MySQL Database
  • HTML
  • CSS
  • JavaScript
  • jQuery
  • Ajax
  • Bootstrap
  • AdminLTE Template
  • and some other libraries/plugins

Features of Purchase Order Management System in PHP MySQL Free Download

Admin Panel
  • Secure Login/Logout
  • Manage Supplier List
  • Manage Item List
  • Create New Purchase Order
  • View/Print Purchase Order
  • Edit Purchase Order Details/Items
  • Delete Purchase Order Details/Items
  • Manage User List
  • Manage System/Company Information
  • Manage Account Details
Staff-Side
  • Secure Login/Logout
  • Manage Supplier List
  • Manage Item List
  • Create New Purchase Order
  • View/Print Purchase Order
  • Edit Purchase Order Details/Items
  • Delete Purchase Order Details/Items
  • Manage Account Details

Online Purchase Order Management System Project

  • Name of Project: Online Purchase Order Management System Project
  • Language:                  PHP
  • Databases used:      MySQL
  • Design used:            HTML JavaScript, Ajax, JQuery, Bootstrap
  • Browser used:          IE8, Google Chrome, Opera Mozilla
  • Software used:         WAMP/ XAMPP/ LAMP/MAMP

Screenshots

[caption id="attachment_13489" align="alignnone" width="830"]Purchase Order Management System in PHP MySQL - Item List Purchase Order Management System in PHP MySQL - Item List[/caption] [caption id="attachment_13490" align="alignnone" width="830"]Purchase Order Management System in PHP MySQL - Purchase Order Purchase Order Management System in PHP MySQL - Purchase Order[/caption] [caption id="attachment_13491" align="alignnone" width="830"]Purchase Order Management System in PHP MySQL Supplier List Purchase Order Management System in PHP MySQL Supplier List[/caption] [caption id="attachment_13492" align="alignnone" width="830"]Purchase Order Management System in PHP MySQL Purchase Order Management System in PHP MySQL[/caption]

How To Run??

Above all, to run this project you must have installed a virtual server i.e XAMPP on your PC. Courier Management System in PHP and MySQL with source code is free to download, Use for educational purposes only! Follow the following steps after Starting Apache and MySQL in XAMPP: 1st Step: Firstly, Extract the file 2nd Step: After that, Copy the main project folder 3rd Step: So, you need to Paste in xampp/htdocs/ Further, Now Connecting Database 4th Step: So, for now, Open a browser and go to URL “http://localhost/phpmyadmin/” 5th Step: After that, Click on the databases tab 6th Step: So, Create a database naming “purchase_order_db” and then click on the import tab 7th Step: Certainly, Click on browse file and select “purchase_order_db.sql” file which is inside the “db” folder 8th Step: Meanwhile, click on Go button. After Creating Database, 9th Step: Moreover, Open a browser and go to URL “http://localhost/purchase_order

Login Access Information

Username: admin Password: admin123 I hope this Purchase Order Management System in PHP MySQL will help you with what you are looking for and hope that you will learn something with this project that is useful for your future projects.
Related Projects: School File Management System using PHP/MySQLi, Budget Management System using PHP/MySQL, Barcode Based School Event Attendance Monitoring System using PHP/MySQL, Online School Attendance Management System in PHP MySQL, School Fees Payment Management System in PHP MySQL, School Log Management System in PHP MySQL, Preschool Management System using PHP/MySQLi, Advanced School Management System with Complete Features, Complete File Management System using PHP MySQL, Task Management System Using PHP MySQL

Free Download Purchase Order Management System in PHP MySQL Source Code

[symple_button url="https://www.campcodes.com/downloads/purchase-order-management-system-in-php-mysql-source-code/" color="blue" button_target="_blank" btnrel="nofollow"]Download Here[/symple_button] https://www.campcodes.com/projects/php/purchase-order-management-system-in-php-mysql-free-download-source-code/?feed_id=3408&_unique_id=62eba463e4832

Monday, August 1, 2022

Online ID Generator System in PHP MySQL Free Download Source Code

Project: Online ID Generator System in PHP MySQL with Source Code Free Download

About Online ID Generator System in PHP MySQL

Online ID Generator System  in PHP MySQL is the name of this PHP project. This project is a web-based app that can create ID card templates on the glide and make ID cards using the templates. The person using the system can make an ID card by using the options that are given, such as text fields and image file uploads. He or she can also decide where each text field and image goes. This system will make it easy and quick to make, store, print, and get ID cards. This online application was built with PHP, MySQL Database, HTML, CSS, JavaScript (both Ajax and jQuery), Bootstrap, and the AdminLTE Template, along with a few more libraries and plugins. This project was conceived using XAMPP version 3.30, and its PHP implementation is version 8.0.7. The Online ID Generator System offers a user interface that is both simple and appealing to use with. In order to administer and access the features and data of the project, the system can only be accessible by a single user, who must provide their credentials in order to get access to the system. Every module may do CRUD operations, print, and download files using this. The created templates, in addition to the generated ID Card, are each stored as an image that can be printed as well as the HTML code that may be edited.

Features of Online ID Generator System in PHP MySQL with Source Code Free Download

  • Secure Login/Logout
    • The page where the admin user submits their system credentials to access the admin side of the system.
  • Manage Template List
    • This is the page to add, edit, or delete a template
  • Generate ID Cards
    • This is a generation of ID cards based on the templates
  • Manage Generated ID Cards
    • This is to add generated ID cards
  • Print Generated ID Card
    • This module can print generated ID cards
  • Download Generated ID Card
    • This module can download generated ID cards
  • Text and image fields that can be moved when making templates
  • Text field font and container configuration
  • Image and ID Card Size Configuration
  • Default Text for each TextFields
  • and more..

Online ID Generator System Project

  • Name of Project: Online ID Generator System Project
  • Language:                  PHP
  • Databases used:      MySQL
  • Design used:            HTML JavaScript, Ajax, JQuery, Bootstrap
  • Browser used:          IE8, Google Chrome, Opera Mozilla
  • Software used:         WAMP/ XAMPP/ LAMP/MAMP

Screenshots

Template Editor View

[caption id="attachment_13471" align="alignnone" width="830"]online id generator in php mysql template online id generator in php mysql template[/caption]

Generate ID Editor View

[caption id="attachment_13472" align="alignnone" width="830"]online id generator in php mysql online id generator in php mysql[/caption]

Generated ID Cards View

[caption id="attachment_13473" align="alignnone" width="830"]online id generator in php mysql generate id list online id generator in php mysql generate id list[/caption] On this site, you can get the source code for free. Feel free to download the source code and change it in any way you want to meet your needs. Follow the steps below to get the project up and running.

How To Run??

Above all, to run this project you must have installed a virtual server i.e XAMPP on your PC. Courier Management System in PHP and MySQL with source code is free to download, Use for educational purposes only! Follow the following steps after Starting Apache and MySQL in XAMPP: 1st Step: Firstly, Extract the file 2nd Step: After that, Copy the main project folder 3rd Step: So, you need to Paste in xampp/htdocs/ Further, Now Connecting Database 4th Step: So, for now, Open a browser and go to URL “http://localhost/phpmyadmin/” 5th Step: After that, Click on the databases tab 6th Step: So, Create a database naming “id_generator_db” and then click on the import tab 7th Step: Certainly, Click on browse file and select “id_generator_db.sql” file which is inside the “db” folder 8th Step: Meanwhile, click on Go button. After Creating Database, 9th Step: Moreover, Open a browser and go to URL “http://localhost/id_generator”

Login Access Information

Username: admin Password: admin123 I hope this Online ID Generator System in PHP MySQL will help you with what you are looking for and hope that you will learn something with this project that is useful for your future projects.
Related Projects: School File Management System using PHP/MySQLi, Budget Management System using PHP/MySQL, Barcode Based School Event Attendance Monitoring System using PHP/MySQL, Online School Attendance Management System in PHP MySQL, School Fees Payment Management System in PHP MySQL, School Log Management System in PHP MySQL, Preschool Management System using PHP/MySQLi, Advanced School Management System with Complete Features, Complete File Management System using PHP MySQL, Task Management System Using PHP MySQL

Free Download Online ID Generator System in PHP MySQL Source Code

[symple_button url="https://www.campcodes.com/downloads/online-id-generator-system-in-php-mysql-source-code/" color="blue" button_target="_blank" btnrel="nofollow"]Download Here[/symple_button] https://www.campcodes.com/projects/php/online-id-generator-system-in-php-mysql-free-download-source-code/?feed_id=3402&_unique_id=62e7e51d45895

Online ID Generator System in PHP MySQL Free Download Source Code

Project: Online ID Generator System in PHP MySQL with Source Code Free Download

About Online ID Generator System in PHP MySQL

Online ID Generator System  in PHP MySQL is the name of this PHP project. This project is a web-based app that can create ID card templates on the glide and make ID cards using the templates. The person using the system can make an ID card by using the options that are given, such as text fields and image file uploads. He or she can also decide where each text field and image goes. This system will make it easy and quick to make, store, print, and get ID cards. This online application was built with PHP, MySQL Database, HTML, CSS, JavaScript (both Ajax and jQuery), Bootstrap, and the AdminLTE Template, along with a few more libraries and plugins. This project was conceived using XAMPP version 3.30, and its PHP implementation is version 8.0.7. The Online ID Generator System offers a user interface that is both simple and appealing to use with. In order to administer and access the features and data of the project, the system can only be accessible by a single user, who must provide their credentials in order to get access to the system. Every module may do CRUD operations, print, and download files using this. The created templates, in addition to the generated ID Card, are each stored as an image that can be printed as well as the HTML code that may be edited.

Features of Online ID Generator System in PHP MySQL with Source Code Free Download

  • Secure Login/Logout
    • The page where the admin user submits their system credentials to access the admin side of the system.
  • Manage Template List
    • This is the page to add, edit, or delete a template
  • Generate ID Cards
    • This is a generation of ID cards based on the templates
  • Manage Generated ID Cards
    • This is to add generated ID cards
  • Print Generated ID Card
    • This module can print generated ID cards
  • Download Generated ID Card
    • This module can download generated ID cards
  • Text and image fields that can be moved when making templates
  • Text field font and container configuration
  • Image and ID Card Size Configuration
  • Default Text for each TextFields
  • and more..

Online ID Generator System Project

  • Name of Project: Online ID Generator System Project
  • Language:                  PHP
  • Databases used:      MySQL
  • Design used:            HTML JavaScript, Ajax, JQuery, Bootstrap
  • Browser used:          IE8, Google Chrome, Opera Mozilla
  • Software used:         WAMP/ XAMPP/ LAMP/MAMP

Screenshots

Template Editor View

[caption id="attachment_13471" align="alignnone" width="830"]online id generator in php mysql template online id generator in php mysql template[/caption]

Generate ID Editor View

[caption id="attachment_13472" align="alignnone" width="830"]online id generator in php mysql online id generator in php mysql[/caption]

Generated ID Cards View

[caption id="attachment_13473" align="alignnone" width="830"]online id generator in php mysql generate id list online id generator in php mysql generate id list[/caption] On this site, you can get the source code for free. Feel free to download the source code and change it in any way you want to meet your needs. Follow the steps below to get the project up and running.

How To Run??

Above all, to run this project you must have installed a virtual server i.e XAMPP on your PC. Courier Management System in PHP and MySQL with source code is free to download, Use for educational purposes only! Follow the following steps after Starting Apache and MySQL in XAMPP: 1st Step: Firstly, Extract the file 2nd Step: After that, Copy the main project folder 3rd Step: So, you need to Paste in xampp/htdocs/ Further, Now Connecting Database 4th Step: So, for now, Open a browser and go to URL “http://localhost/phpmyadmin/” 5th Step: After that, Click on the databases tab 6th Step: So, Create a database naming “id_generator_db” and then click on the import tab 7th Step: Certainly, Click on browse file and select “id_generator_db.sql” file which is inside the “db” folder 8th Step: Meanwhile, click on Go button. After Creating Database, 9th Step: Moreover, Open a browser and go to URL “http://localhost/id_generator”

Login Access Information

Username: admin Password: admin123 I hope this Online ID Generator System in PHP MySQL will help you with what you are looking for and hope that you will learn something with this project that is useful for your future projects.
Related Projects: School File Management System using PHP/MySQLi, Budget Management System using PHP/MySQL, Barcode Based School Event Attendance Monitoring System using PHP/MySQL, Online School Attendance Management System in PHP MySQL, School Fees Payment Management System in PHP MySQL, School Log Management System in PHP MySQL, Preschool Management System using PHP/MySQLi, Advanced School Management System with Complete Features, Complete File Management System using PHP MySQL, Task Management System Using PHP MySQL

Free Download Online ID Generator System in PHP MySQL Source Code

[symple_button url="https://www.campcodes.com/downloads/online-id-generator-system-in-php-mysql-source-code/" color="blue" button_target="_blank" btnrel="nofollow"]Download Here[/symple_button] https://www.campcodes.com/projects/php/online-id-generator-system-in-php-mysql-free-download-source-code/?feed_id=3396&_unique_id=62e7e4e646b87

Online ID Generator System in PHP MySQL Free Download Source Code

Project: Online ID Generator System in PHP MySQL with Source Code Free Download

About Online ID Generator System in PHP MySQL

Online ID Generator System  in PHP MySQL is the name of this PHP project. This project is a web-based app that can create ID card templates on the glide and make ID cards using the templates. The person using the system can make an ID card by using the options that are given, such as text fields and image file uploads. He or she can also decide where each text field and image goes. This system will make it easy and quick to make, store, print, and get ID cards. This online application was built with PHP, MySQL Database, HTML, CSS, JavaScript (both Ajax and jQuery), Bootstrap, and the AdminLTE Template, along with a few more libraries and plugins. This project was conceived using XAMPP version 3.30, and its PHP implementation is version 8.0.7. The Online ID Generator System offers a user interface that is both simple and appealing to use with. In order to administer and access the features and data of the project, the system can only be accessible by a single user, who must provide their credentials in order to get access to the system. Every module may do CRUD operations, print, and download files using this. The created templates, in addition to the generated ID Card, are each stored as an image that can be printed as well as the HTML code that may be edited.

Features of Online ID Generator System in PHP MySQL with Source Code Free Download

  • Secure Login/Logout
    • The page where the admin user submits their system credentials to access the admin side of the system.
  • Manage Template List
    • This is the page to add, edit, or delete a template
  • Generate ID Cards
    • This is a generation of ID cards based on the templates
  • Manage Generated ID Cards
    • This is to add generated ID cards
  • Print Generated ID Card
    • This module can print generated ID cards
  • Download Generated ID Card
    • This module can download generated ID cards
  • Text and image fields that can be moved when making templates
  • Text field font and container configuration
  • Image and ID Card Size Configuration
  • Default Text for each TextFields
  • and more..

Online ID Generator System Project

  • Name of Project: Online ID Generator System Project
  • Language:                  PHP
  • Databases used:      MySQL
  • Design used:            HTML JavaScript, Ajax, JQuery, Bootstrap
  • Browser used:          IE8, Google Chrome, Opera Mozilla
  • Software used:         WAMP/ XAMPP/ LAMP/MAMP

Screenshots

Template Editor View

[caption id="attachment_13471" align="alignnone" width="830"]online id generator in php mysql template online id generator in php mysql template[/caption]

Generate ID Editor View

[caption id="attachment_13472" align="alignnone" width="830"]online id generator in php mysql online id generator in php mysql[/caption]

Generated ID Cards View

[caption id="attachment_13473" align="alignnone" width="830"]online id generator in php mysql generate id list online id generator in php mysql generate id list[/caption] On this site, you can get the source code for free. Feel free to download the source code and change it in any way you want to meet your needs. Follow the steps below to get the project up and running.

How To Run??

Above all, to run this project you must have installed a virtual server i.e XAMPP on your PC. Courier Management System in PHP and MySQL with source code is free to download, Use for educational purposes only! Follow the following steps after Starting Apache and MySQL in XAMPP: 1st Step: Firstly, Extract the file 2nd Step: After that, Copy the main project folder 3rd Step: So, you need to Paste in xampp/htdocs/ Further, Now Connecting Database 4th Step: So, for now, Open a browser and go to URL “http://localhost/phpmyadmin/” 5th Step: After that, Click on the databases tab 6th Step: So, Create a database naming “id_generator_db” and then click on the import tab 7th Step: Certainly, Click on browse file and select “id_generator_db.sql” file which is inside the “db” folder 8th Step: Meanwhile, click on Go button. After Creating Database, 9th Step: Moreover, Open a browser and go to URL “http://localhost/id_generator”

Login Access Information

Username: admin Password: admin123 I hope this Online ID Generator System in PHP MySQL will help you with what you are looking for and hope that you will learn something with this project that is useful for your future projects.
Related Projects: School File Management System using PHP/MySQLi, Budget Management System using PHP/MySQL, Barcode Based School Event Attendance Monitoring System using PHP/MySQL, Online School Attendance Management System in PHP MySQL, School Fees Payment Management System in PHP MySQL, School Log Management System in PHP MySQL, Preschool Management System using PHP/MySQLi, Advanced School Management System with Complete Features, Complete File Management System using PHP MySQL, Task Management System Using PHP MySQL

Free Download Online ID Generator System in PHP MySQL Source Code

[symple_button url="https://www.campcodes.com/downloads/online-id-generator-system-in-php-mysql-source-code/" color="blue" button_target="_blank" btnrel="nofollow"]Download Here[/symple_button] https://www.campcodes.com/projects/php/online-id-generator-system-in-php-mysql-free-download-source-code/?feed_id=3390&_unique_id=62e7e4b896ecc

Monday, May 16, 2022

10 WordPress Security Checklist to Protect Your Site From Hackers

10 WordPress Security Checklist to Protect Your Site From Hackers

WordPress is a versatile and diverse operating system that is almost incomparable. The CMS has undergone tremendous evolution, and so has its user base. It was once used primarily for operating small blog websites. Today, WP powers some of the biggest eCommerce websites, and news sites, among many others. Its versatility and ease of use have made WordPress a favorite choice among webmasters. Today, WordPress powers an enormous chunk of the web. According to data released by W3Techs, WordPress powers over 40% of the web. Its popularity has also attracted villains. WP security remains a significant subject. You should note that the CMS is an open-source platform controlled by no one. This means that anyone is free to create a theme or plugin that can be adopted by thousands of users. The downside to this scenario is that it makes it extremely difficult for WP to secure its ecosystem. Still not convinced over the WP insecurities? According to a Sucuri report released a few years ago, WordPress was the leading infected platform, contributing to 90% of cleanup requests. The big question is how one can protect WordPress site from hackers. This article explores the WordPress security checklist, tips, and measures that you need to secure your WordPress website from attacks.
  1. Move The WordPress Site to HTTPS

The Secure Socket Layer (popularly known by the abbreviation SSL) certificate is a web transfer protocol that helps to encrypt the transfer of data between web servers and users’ browsers. A website with an SSL certificate will run on HTTPS rather than the HTTP protocol. It is essential to move the WordPress website to HTTPS. Because of the encrypted HTTPS connection, nobody can successfully sniff into communication or eavesdrop on the communication between parties on the internet. While on the quest to secure your WordPress site, an SSL certificate should appear top of your WP security checklist. SSL certificates are typically issued by certificate authorities. Their prices range from 10 dollars to hundreds of dollars. For a startup, this price might be almost unaffordable, and this might have been the reason why most websites continued using the insecure HTTP protocol even after learning about the essence of the certificates. However, free, cheap, or expensive, all certificates offer the same level of encryption- 256-bit encryption. If you are low on budget, it is to recommend to go for the cheap positive SSL certificate, RapidSSL certificate, etc. With this certificate, your WP website will get to enjoy up to six years of coverage, HTTPS, a padlock symbol, Unlimited server licensing, and compatibility with most web browsers.
  1. Keeping Up with WP Updates

WordPress updates are crucial for your website’s stability, functionality, and security. The updates come with enhanced security features that address security vulnerabilities in the older versions. By default, WordPress is set to conduct automatic updates for minor updates. But for major updates, you will have to initiate the update manually. You must know that this content management system also comes with thousands of plugins, themes, and extensions, maintained by third-party vendors and developers. There will be frequent update releases to the themes and plugins, which you will also need to install. From the onset, installing all the updates on your WP might seem like a tedious task. But which one is better- Taking time to install the updates or living with software vulnerabilities that put you right at the jaws of hackers? For your information, 44% of website hacks are caused by outdated WP websites.
  1. Login and User Authentication Strengths

Stolen login credentials are among the most common techniques hackers use to infiltrate WordPress websites. The best strategy will be to make your passwords and usernames hard to guess and unique to your account. The strong and unique password strategy should not only apply to the admin areas, but they should also extend to WP hosting accounts, custom email addresses, databases, and FTP accounts. Most WP users find it a bit difficult to use strong and unique passwords because they find them hard to remember. But the good thing for users is that they do not have to remember the passwords by themselves. With so many password manager tools, users will have an easy time remembering passwords. But what exactly does it mean to have a strong and unique password? Password strength is defined by the complexity of characters and length. A good and strong password should be eight characters or more and blend numbers, symbols, and special characters. A unique password is defined by its frequency of use. For it to be referred to as unique, a password should only be used once.
  1. Secure and Reliable Web Hosting Company
The WordPress hosting provider you pick for your site will play a very crucial role in the security of your WP website. An excellent shared host such as Bluehost or SiteGround will take the extra measures to protect your WordPress website from common security vulnerabilities. Here is how an excellent web hosting provider will help secure your WP site from security threats.
  • They will frequently monitor the network to discover and prevent suspicious activities
  • They have sufficient tools and mechanisms to prevent large scale Distributed Denial of Service attacks
  • They will frequently update their software PHP versions and hardware devices to prevent attackers from exploiting a known security flaw in the old versions
  • They have adequate disaster recovery and accident plans to protect their data from major attacks.
Note that you share the server with many other websites on a shared hosting plan, and this opens up your WordPress website to cross-site contamination where a hacker could use a neighboring website to attack your website. It would be wise to adopt the managed WordPress hosting service to avoid such cases. Managed hosting services offer so many benefits, such as automated backup systems and updates as well as more enhanced configurations that protect your website.
  1. WordPress Backup Solutions

Backups are the last line of defense against WP attacks. Always remember that in cybersecurity, nothing is 100% guaranteed. Even the most elaborate and strongest security systems have always fallen victim to attacks. If complex government systems can be hacked, so can your small business blog. A well-defined WP backup system will allow you to restore order and data if things go wrong. And there is always some great news with WordPress and its plugins. You can leverage the many free or premium WordPress backup plugins to do the work for you. But always remember to regularly save your full-site backups at a remote location other than your hosting account. Cloud Service providers such as Amazon, Dropbox, or private clouds like Stash would be excellent secondary storage locations for your backup files.
  1. Have the Web-Application Firewall Enabled

Using a web application firewall is one of the easiest ways to safeguard your WordPress website and be confident about its security. The web application firewall acts as an intermediary between your internal network and external traffic. It helps to monitor malicious attempts by hackers to enter your system. It will block all malicious traffic and prevent it from ever reaching your website. There are two firewall levels that are relevant to your WordPress website. The first is the DNS level website firewall, which helps route your website traffic through cloud proxy servers. And this allows them to only send genuine traffic to your website servers. The second is the application-level firewall, which is a plugin that monitors a site’s traffic when it reaches the servers but before the traffic loads the WP scripts. A web application firewall like Sucuri will be an excellent option you can rely on to safeguard your website from vulnerabilities.
  1. Change the default admin username

‘admin’ is often the default username for WP. User names make up half of the login credentials, and this leaves hackers with an easy job of having to guess passwords only. Therefore, the default admin user makes it easy for hackers to conduct brute force attacks on your website. Thanks to WordPress, users now have to select a custom username when installing WP. But most users still prefer using ‘admin’ as their default username. There are three ways you can use to change the username. First, you can create a fresh admin username and delete the old one. Secondly, you can update your username from your phpMyAdmin panel. And lastly, you can install the username changer plugin.
  1. Limit Login Attempts

By default, users can try logging into their WP accounts as many times as they want. This leaves your WP website vulnerable to dictionary and brute force attacks. Hackers will try several username and password combinations to try and guess their way through your WP. To prevent this scenario from happening, limiting failed login attempts would be a great idea. If you have the web application firewall installed on your servers, this would automatically be taken care of. If you do not have the firewall, you can install the Login Lockdown plugin to help you out.
  1. Use the Two-Factor Authentication

Usernames and passwords might fail you. Brute force attacks have been successful in the past, and they still could be on your WP website. Two-factor authentication is where a second authentication factor is used in addition to usernames and passwords. With 2FA, even if a hacker succeeded in bypassing your username and password, the hacker will still not access your account for lack of the second authentication factor. For enhanced WP security, you will need to employ the 2-FA feature. You will have to install the two-factor authentication WordPress plugin and activate the plugin. Upon activating the plugin, you will have to click on the “Two Factor Auth” link on the WP sidebar. There are several 2-FA authentication options, such as using one-time passwords, secret codes, or biometric authentication features.
  1. Regularly Scans for Malware and other Security Vulnerabilities

Malware infections are rampant threats in the cybersecurity sphere. They will infiltrate your website to deface it, interfere with its normal functioning and do all sorts of harm to your website. You should consider using antimalware software that will scan through your WP website to detect and stop malware from causing any damage to your website. Just remember to keep your antimalware scanners up to date to make them efficient.

Conclusion

WordPress is a popular Content Management System that now powers a significant chunk of the web. Its popularity also makes it a hotbed for hackers. Today, there are lots of WP security issues and vulnerabilities that ought to be addressed keenly. Users should know some of the WordPress security tips and tricks that would help them protect WordPress sites from hackers. In this 10-point WordPress security checklist, you will learn some of the proven WP security measures that are vital for protecting your site from attacks. https://www.campcodes.com/blog/10-wordpress-security-checklist-to-protect-your-site-from-hackers/?feed_id=3385&_unique_id=6282ef91c0eee

Online Payroll System in PHP and MySQL Free Download: A Comprehensive Guide

As a business owner, one of the most important tasks is to manage payroll. Having a reliable payroll system in place is essential to ensur...